Week 11
What kind of crocheter are you? Do you like to follow a pattern exactly
as written? Do you like to “wing it” and make things up as you go? Are
you a little of both?
52 Week Crochet Challenge
For me, as my crocheting year have progressed, I'd have to say I'm a little of both (and I say that very loosely) but it depends on what I'm making. I usually (95% of the time) follow a pattern letter for letter but sometimes I feel an extra step, my personal touch (eg, a cute scalloped edge or extra increases or rounds for sizing or embellishments for decor) may enhance an already awesome pattern. I don't really "wing it" since I only started making my own patterns recently (and that too, a lot of time and effort goes into creating one...even a simple one. I'm still learning!!) unless it was a quick scarf for my son when he was a baby or some wash cloths with my left over cotton yarn. As I said in Week 10, I use to have a difficult time reading patterns and ended up having to rewrite them in order to understand all the abbreviations, so I never, ever, EVER would have tried adding or subtracting from a pattern, and forget "winging it", I wouldn't have even entertain such a crazy idea. But over the years, I've gotten much more comfortable with my skills and now I do what feels and looks right for a pattern, to me.
Friday, 16 May 2014
Thursday, 15 May 2014
The Pokémon Inspiration Part 2
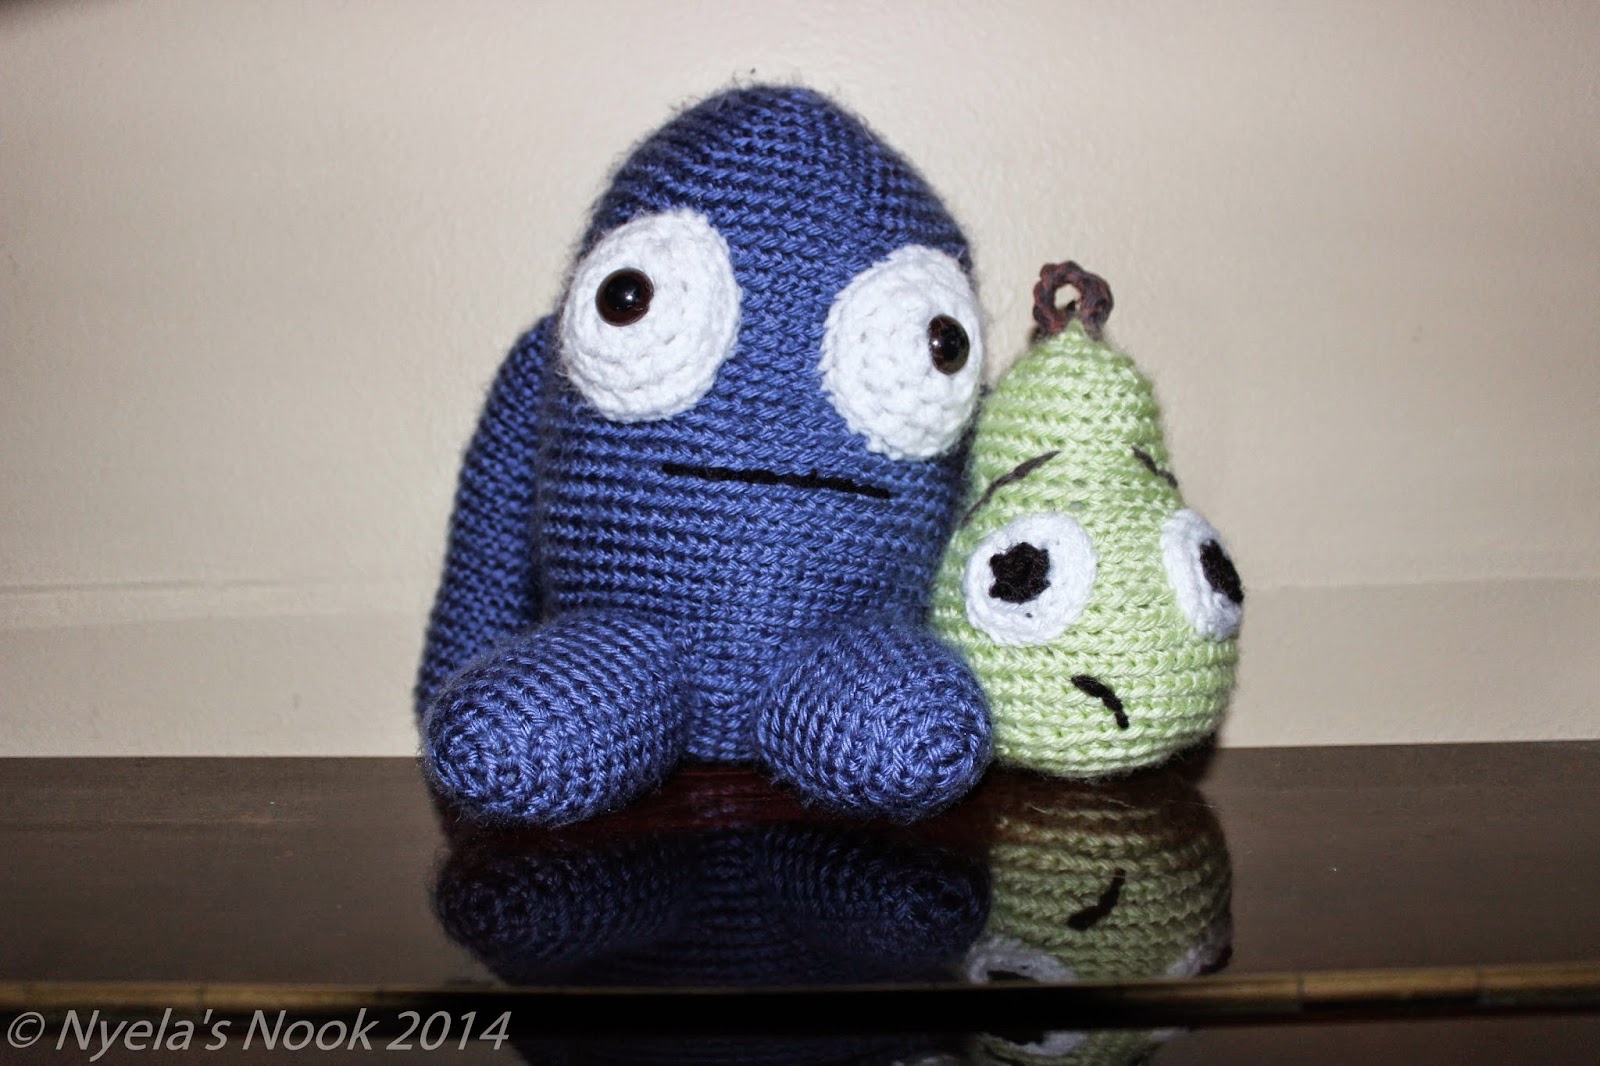
I have been working on a pattern for some Plants Vs. Zombies inspired toys for my kids because they are obsessed with PvZ and I ended up being really inspired to use features from my PvZ pattern to make a few Pokémon inspired Pokéballs and this is what I came up with. My kids are also super Pokémon fans, so this worked out well. Please let me know if there are any errors and I'll fix it up right away. Enjoy!
Pokéball Inspired Toy
© Copyright 2014 Nyela d’Endel


Worsted weight (4) yarn in 3 colours (I used Red Heart Super Saver yarn)
(A) red (usually red, but you can use any colour. Here's a list of different Pokéballs)
(B) black
(C) white
G /6-4.25mm hook
H/8-5.00mm hook
polyester stuffing
tapestry needle
chain marker
(A) red (usually red, but you can use any colour. Here's a list of different Pokéballs)
(B) black
(C) white
G /6-4.25mm hook
H/8-5.00mm hook
polyester stuffing
tapestry needle
chain marker
No gauge required
Abbreviations
Rnd = round
ch = chain
sc = single crochet
st = stitch
sts = stitches
sl st = slip stitch
dec = decrease
F/O = fasten off
ch = chain
sc = single crochet
st = stitch
sts = stitches
sl st = slip stitch
dec = decrease
F/O = fasten off
Using your H/8-5.00mm hook and colour (A) yarn, work in rounds. Place a stitch marker in last st of every rnd and mover marker up at the end of each rnd.
Rnd 1 – Ch 2, 6 sc in second ch from hook (6)
Working in back loops only
Rnd 2 - 2 sc in each sc (12) Place stitch marker here and move up at the end of each rnd.
Rnd 4 - *2 sc in next st, 1 sc in next 2 sts* repeat from * to * (24)
Rnd 5 - *2 sc in next st, 1 sc in next 3 sts* repeat from * to * (30)
Rnd 6 - 1 sc in each sc (30)
Rnd 5 - *2 sc in next st, 1 sc in next 3 sts* repeat from * to * (30)
Rnd 6 - 1 sc in each sc (30)
Rnd 7 - 1 sc in each sc and join with sl st in last sc of rnd. F/O with colour (A) (30)
Using colour (B) yarn
Continue working in back loops only
Rnd 8 - join yarn (B) with sl st in same st as the sl st from the previous rnd and 1 sc around. Sl st in last sc of rnd and F/O with colour (B) (30)
Using colour (C) yarn and working in rounds and using a stitch marker to mark your place.
Continue working in back loops only
Rnd 9 - join with sl st (as in rnd 8) and 1 sc around (30)
Rnd 10 - 1 sc around (30)
Rnd 11 - *1 sc dec with next 2 sts, 1 sc in next 3 sts* repeat from * to * (24)
Rnd 12 - *1 sc dec with next 2 sts, 1 sc in next 2 sts* repeat from * to * (18)
Stuff the ball firmly (after use, the ball will go limp and won't hold its shape if not stuffed enough) using the polyester stuffing.
Stuff the ball firmly (after use, the ball will go limp and won't hold its shape if not stuffed enough) using the polyester stuffing.
Rnd 13 - *1 sc dec with next 2 sts, 1 sc in next st* repeat from * to * (12)
Rnd 14 - *1 sc dec with next 2 sts* repeat from * to * (6)
Rnd 15 - 1 sc dec with next st, 1 sc dec with 4th st, F/O and secure. Hide tail inside the ball

The Pokéball button
With G/6-4.25mm hook
Using colours (C) white, and (B) black only
With colour (C)
Rnd 1 - ch 2, 6 sc in second chain from hook. Join with a sl st to first stitch and attach colour (B).
Rnd 1 - ch 2, 6 sc in second chain from hook. Join with a sl st to first stitch and attach colour (B).
With colour (B)
Rnd 2 - ch 1, 2 sc in each st around. Join with sl st in first sc (do not join in ch st). F/O and leave a long tail to attach to ball.
Centre button over the black stripe where you did all your joining of coloured yarns (hiding all the joins) and secure by weaving the tail around the button.

Wednesday, 14 May 2014
My 52 Week Crochet Challenge: Week 10
So week 9 was a success. I organized all my patterns on ibooks and now everything is a lot easier to find. I should have done it from the start, but didn't know my pattern list would grow so fast. It is now much easier to have my patterns on my ipad instead of desktop, that way I don't have to print anything up!!
Week 10
What was your first completed project?
52 Week Crochet Challenge
My first completed project was a Shell Baby Blanket I made for my son when I was pregnant with him. I had just started teaching myself how to crochet a few months prior and this was also the first project that I worked on with real pattern abbreviations. Before this, I use to print out a pattern and go back and retype it all into a word document with the full words (example, *ch 2, 3 dc in next st, skip 2 sts and 3 dc in next st* rep from * to * till end. I would have typed this all out as Chain 2, 3 double crochets in the next stitch and then skip 2 stitches and 3 more double crochets in the next stitch and repeat all the way across) so it would be easier for me to read. It may have taken a lot longer to retype some of my previous patterns out then just winging it, but I needed to do that to get the hang of reading a pattern. Plus my other patterns were just simple granny squares, this was my first real project. Unfortunately, the blanket has been put away and stored up for now. Once my son got older, I packed it away for him to hopefully one day give to one of his kids.
Sunday, 4 May 2014
My 52 Week Crochet Challenge: Week 9
I am still really new to blogging and have been trying to figure out how to create a separate "page" for the My 52 Week Crochet Challenge. I would love to have all of these posts together, but for now, I'll just have to post it on the home page till I can figure this stuff out!
Week 9
Organize your patterns this week. Do you have a special system for your patterns? Can you find a specific pattern easily?
52 Week Crochet Challenge
Well, this weeks challenge is simple. All my patterns are organized fairly nicely and are somewhat easily accessible. I'm sure I could do a lot more to totally organize my patterns, but I haven't yet.
Right now I have all my purchased and free downloaded patterns on my iPads iBooks app, all my printed patterns in a folder (which is neatly categorized into hats, afghans, Amigurumi, slippers, winter accessories, appliqués, baby and Misc. I also have a section for yarn labels that have patterns printed on the back. These 'label patterns' are placed in envelops which are also subcategorized and placed in the folder) and all my 'wish list' items are in my Ravelry library. I also have a bookmark folder on my desktop computer called 'Crochet' (original, eh?!) for all the crochet related websites and blogs that I frequent regularly.
I probably could do a better job categorizing the patterns on my iBook app by creating specific collections like the ones I have for my printed patterns (hats, appliqués, afghans, Amigurumi...etc) so I guess that's what I shall do this week for this challenge, sort my iBook patterns!
Wednesday, 30 April 2014
My 52 Week Crochet Challenge: Week 8
A few days ago I joined a 52 week crochet challenge.
Each week there is a new task to be completed. The challenge
started 7 weeks ago, but they say just jump in and join there is no need to start at the
beginning. So this is MY 52 Week Crochet Challenge.
Week
8
This week your challenge is to go through
any unfinished projects you've had sitting around and either work it or frog
it. If you don't have any unfinished projects (really?!) then show us
what you've been working on.
Last month I started working on a Pokemon inspired Charmander doll for my son. I got about half way done and then got side
tracked. Well, for this challenge I have resumed working on the doll and
hope to finish him soon.
This is the only before photo I have. Note, there is no legs, no feet
and no tail. The mouth is not finished and I still need to add the eyes
and nose.
*The free bunny rattle pattern can be found here Easy Amigurumi Bunny by Tangled Happy. Made for my nephew for Easter!
I guess I didn't complete this challenge because I'm still missing the felt eye and felt flames for the tail. Still need to pick up some red, yellow and orange felt to complete, but my son plays with it as is.
*The free bunny rattle pattern can be found here Easy Amigurumi Bunny by Tangled Happy. Made for my nephew for Easter!
 |
| After |
 | |
| Before |
Friday, 18 April 2014
My Cute Little Bags

This is the first pattern I have written and I hope it makes sense to you. It makes sense to me, but then again, I know what I'm trying to say!!!
If there are any problems or corrections needed, please feel free to leave a message and I will fix it up.
So here it is, my first pattern, enjoy!
Cute Little Bags
© Copyright 2014 Nyela d’Endel
© Copyright 2014 Nyela d’Endel
Materials needed
Worsted weight (4) cotton yarn in 4 colours (A, B, C, D)
H/8 - 5.00mm hook
Chain marker
Tapestry needle
No gauge required
Abbreviations
Rnd = round
ch = chain
sc = single crochet
hdc = half double crochet
dc = double crochet
st = stitch
sts = stitches
sl st = slip stitch
dec = decrease
F/O = fasten off
ch = chain
sc = single crochet
hdc = half double crochet
dc = double crochet
st = stitch
sts = stitches
sl st = slip stitch
dec = decrease
F/O = fasten off
Using your H/8-5.00mm hook and working in rounds. Place a stitch marker in the last st of the rnd and move marker up at the end of each rnd.
**How to
change the colour of yarn working in hdc rounds. Start by making an hdc as you would normally…
insert hook, pull up a loop, there should be 3 loops on your hook, but now use
the new colour to pull through all 3 loops on hook.
With
yarn (A)
Rnd 1 -
Ch 16, hdc in 2nd ch from hook and then 1 hdc across. Work 1 extra hdc in last ch. Do not turn, instead, work on bottom loops of
the chain and 1 hdc across working 1 extra hdc in last ch. Place stitch marker
(32)
Rnd 2 -
1 hdc in each hdc around. Place a stitch
marker (32)
Rnd 3 -
1 hdc in each hdc around changing to colour (B) yarn with last stitch** (32)
Rnd 4 -
1 hdc in each hdc around (32)
Rnd 5 -
1 hdc in each hdc around (32)
Rnd 6 - 1
hdc in each hdc around changing to colour (C) yarn with last stitch** (32)
Rnd 7 -
1 hdc in each hdc around (32)
Rnd 8 - 1
hdc in each hdc around (32)
Rnd 9 -
1 hdc in each hdc around changing to colour (D) yarn with last stitch** (32)
Rnd 10 -
1 hdc in each hdc around (32)
Rnd 11 -
1 hdc in each hdc around (32)
Rnd 12 -
1 hdc in each hdc around changing back to colour (A) yarn with last stitch**
(32)
Rnd 13 -
1 sc in each hdc around (32)
Rnd 14 - *1 sc in next 4 sc, ch 8, skip 8 stitches, 1 sc
in next 4 sc*. Repeat from * to * once
around (32)
Rnd 15 - 1 sc in each sc and each ch space around (32)
Rnd 16 - 1 sc in next 4 sc, 1 hdc in next 8 sc, 1 sc in
next 8 sc, 1 hdc in next 8 hdc 1 sc in next 3 sc and 1 sl st in last stitch
around (32)
F/O and weave in all tails inside the bag.
Large Flower
 1. 12 sc in a magic
ring, sl st to close.
1. 12 sc in a magic
ring, sl st to close.
2. Ch 2, 2 dc in same
place as the ch 2. 2 dc in next sc, ch 2
and sl st in same stitch.
3. *Sl st in next
sc, ch 2, 2 dc in same sc as sl st, 2 dc in next sc, ch 2 and sl st in same
stitch*. Repeat from * to * 4 more times
for a total of 6 petals.
4. F/O and make
sure to leave a long tail for attaching to the bag.
 Small Flower
1. 6 sc in a magic ring, sl st to close.
2. Ch 2, 1 dc in same sc as chain, sl in same sc
3. *Ch 2, 1 dc in next sc, sl st in the
same sc as dc*. Repeat from * to * 4 more
times for a total of 6 petals.
4. F/O and
make sure to leave a long tail for fastening to the bag.
Thursday, 17 April 2014
My Plunge into Amigurumi
I have been working with a lot of amigurumi lately; stepping out of my comfort zone and trying something different. It all started when my sister-in-law announced that she was pregnant. I wanted to make something special for her that no one else would. My mother-in-law knits, so I figured she'd be getting a lot of clothes, hats, blankets...the usual baby knit goods. I started looking up gift ideas and I came across this super cute pattern for an airplane. I crocheted one up and loved it. I crocheted 3 more and turned it into a baby mobile. I wish I had taken a photo of it. It was so adorable. I will be asking my sister-in-law if she could send me a photo so I can post one!
With that in hand I came across a course on Craftsy all about amigurumi and how to create patterns for toys from drawings. My son begged me to take the lesson because he wanted me to make some toys out of drawings of his, so I decided to take the plunge and learn how to create my own amigurumi patterns. I loved this course. It was so eye opening. I had no idea that's how patterns are created. I've already got a few of my own I've started. One is from a drawing my son made!! I loved the course so much I enrolled in the second course 'how to create amigurumi woodland animals', but I haven't had time to start it yet.
Currently I have been working on some other amigurumi toys (patterns others have created). A Charmander doll...er...toy for my son, which is about half completed. A Pokeball pattern I created (I will be posting my first free pattern soon!) for my younger son and some Plant vs. Zombie (computer game) inspired toys for both my boys. I have finished making 2 monsters and an Owl Amigurumi and a Bunny Softie Amigurumi for my nephew.
 It has been a busy few weeks!
Subscribe to:
Posts (Atom)